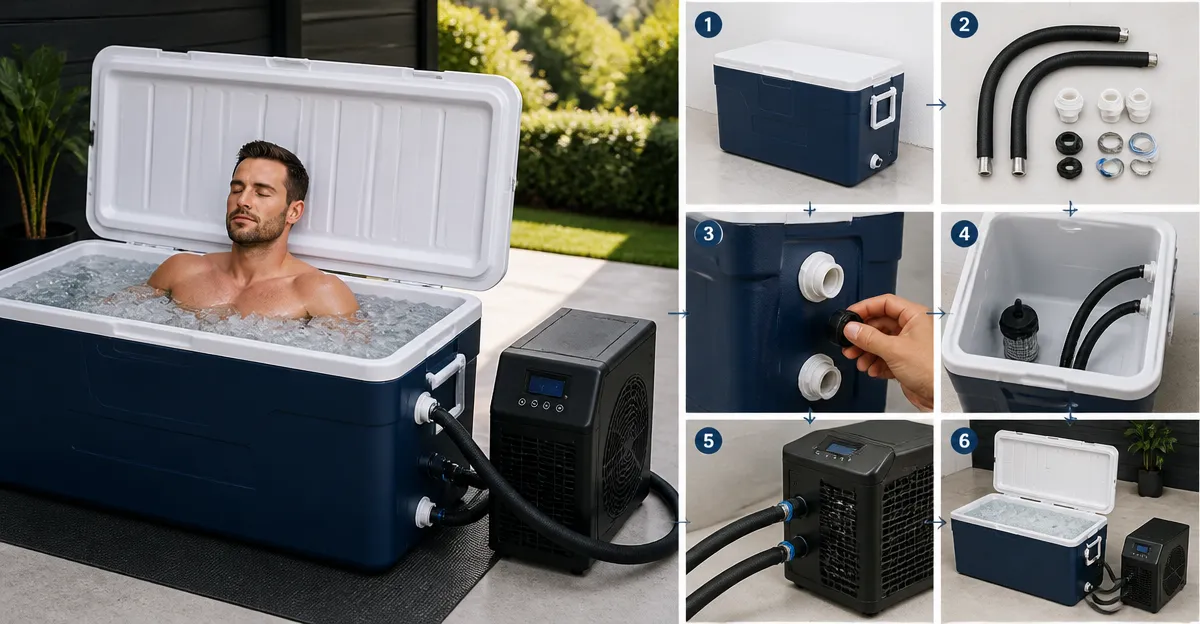
How to Build a DIY Ice Bath Using a Chest Cooler and Chiller: Step‑by‑Step Home Cold Therapy Guide
Introduction
Cold‑water immersion has become a mainstream recovery method for athletes, fitness enthusiasts, and anyone seeking relief from inflammation. This guide teaches the reader how to construct a durable, portable ice bath at home using a chest cooler and a chiller. By following the instructions, one will create a safe, temperature‑controlled immersion tub without the expense of a commercial unit.
The value of a DIY solution lies in its affordability, customizability, and the ability to store the bath when not in use. The reader will learn material selection, assembly, drainage, and maintenance, ensuring a reliable cold‑therapy experience.
What You'll Need
- A high‑capacity insulated chest cooler (recommended: Igloo Hard Cooler)
- A secondary cooler for ice storage or rapid chilling (recommended: Coleman Chiller Cooler)
- Ice blocks or reusable ice packs
- Water‑proof thermometer (optional)
- Drain hose or garden hose for water removal
- Rubber mat or non‑slip surface for placement
Step 1 – Select the Primary Cooler
The core of the ice bath is a sturdy, insulated chest cooler that can hold a sufficient volume of water and ice. The Igloo Hard Cooler is an excellent choice because it offers a large capacity, UV‑inhibiting lid, and a stain‑ and odor‑resistant liner. At $115.99 and a 4.6‑star rating from 11,705 reviews, it balances cost with durability. Its threaded drain plug enables easy water removal without tilting the unit, and reinforced swing‑up handles simplify transport.
Alternative options such as the Coleman Classic Cooler provide similar insulation but lack the integrated drain plug, making the Igloo model preferable for a permanent bath setup.
Step 2 – Prepare the Ice Supply
To achieve and maintain the target temperature (10‑15 °C for therapeutic benefit), a secondary cooler filled with ice is used as a “chiller.” The Coleman Chiller Cooler retains ice for up to 60 hours, thanks to TempLock foam insulation. Priced at $44.88 with a 4.6‑star rating from 16,585 reviews, it is lightweight (7.6 lb empty) and includes swing‑up handles for easy loading of ice blocks.
Fill the Chiller with large ice blocks or frozen water bottles the night before use. The upright interior accommodates 2‑liter bottles, preventing spills and maximizing cooling efficiency. When the ice in the primary cooler begins to melt, transfer fresh ice from the Chiller to maintain consistent temperature.
Step 3 – Install Drainage System
Effective drainage prevents water accumulation and facilitates quick emptying after each session. The Igloo Hard Cooler’s threaded drain plug can be connected to a standard garden hose. Secure the hose to the plug, position the outlet toward a floor drain or external area, and tighten the latch to avoid leaks.
If a hose is unavailable, a simple siphon using a flexible tube works: submerge one end in the cooler, create suction, and direct the flow to a bucket. Ensure the cooler sits on a rubber mat to protect flooring and provide a non‑slip surface.
Step 4 – Assemble the Bath and Test Temperature
Place the primary cooler on the prepared mat, then fill it with cold water to the desired level (typically 12‑15 inches for seated immersion). Add the pre‑chilled ice from the secondary cooler. Stir gently to distribute the cold evenly.
Insert a waterproof thermometer to monitor the water temperature. Ideal therapeutic ranges are 10‑15 °C (50‑59 °F). Adjust ice volume accordingly: more ice for lower temperatures, fewer blocks for a milder chill.
Close the lid securely using the dual snap‑fit latches and child‑safety latch. The lid can serve as a seat for resting between sets, supporting up to 250 lb, which adds convenience during prolonged recovery sessions.
Step 5 – Safety, Usage, and Maintenance
Before entering, ensure the water depth is appropriate for the user’s height; the water should not exceed the waist for most individuals. Limit immersion time to 10‑15 minutes for beginners, gradually extending as tolerance improves.
After each session, activate the drain plug, allowing water to exit completely. Rinse the interior with fresh water, wipe the liner with a damp cloth, and allow the cooler to dry. The stain‑resistant liner of the Igloo Hard Cooler simplifies cleanup, while the Coleman Classic’s EZ‑Clean lid offers similar convenience.
Store both coolers in a dry, shaded area to protect the UV‑inhibiting lid from prolonged sunlight exposure, extending the lifespan of the insulation.
Tips & Pro Tips
- Pre‑freeze large water bottles in the Chiller for extended cooling without added weight.
- Cover the cooler with a tarp when not in use to shield the UV‑inhibiting lid.
- Use a floating waterproof Bluetooth speaker for music without compromising safety.
- For deeper immersion, consider adding a second Igloo Hard Cooler stacked securely, but ensure the combined weight does not exceed handle ratings.
Troubleshooting
- Ice melts too quickly: Verify that the Chiller’s ice is fully frozen and that the primary cooler’s lid is sealed tightly. Replace any damaged seals.
- Water leaks from the drain plug: Re‑tighten the threaded plug and check for debris obstructing the seal.
- Temperature does not drop below 15 °C: Increase ice volume or add frozen gel packs; ensure the water is initially cold.
Conclusion
By selecting a high‑quality insulated cooler, employing a dedicated chiller, and installing an efficient drainage system, one can create a reliable DIY ice bath for regular cold‑therapy sessions. The guide provides a cost‑effective alternative to commercial tubs while delivering the same therapeutic benefits. Consistent use, proper maintenance, and adherence to safety guidelines will ensure long‑term success and enhanced recovery.
Products Mentioned in This Guide
Frequently Asked Questions
What materials are required to build a DIY ice bath with a chest cooler?
You need an insulated chest cooler, a secondary cooler or chiller for ice, ice blocks, a water‑tight seal, a drain valve, and optional insulation or a temperature controller.
How does a chiller improve the ice bath compared to using ice alone?
A chiller continuously circulates cold water, maintaining a consistent temperature and reducing the amount of ice needed for long sessions.
Is a DIY chest‑cooler ice bath safe for regular use?
Yes, as long as the cooler is sealed, the water is filtered, temperature is monitored, and you avoid sub‑freezing water that can cause hypothermia.
How can I drain and store the DIY ice bath when not in use?
Install a simple drain valve at the bottom of the cooler and empty the water after each use; then fold or store the cooler in a dry place.
What are the cost advantages of a DIY ice bath over a commercial unit?
A DIY setup typically costs a fraction of a commercial tub—often under $200 for the cooler and chiller—while offering customizable size and portability.